When I first started this blog, one of the things I envisioned it becoming was a kind of general advice source. As time has gone on and I've become more serious about providing that advice, a few things have really solidified in my mind:
1.) There are a lot of repeatedly used topics out there - There are many aspects to painting and modeling. There are also a ton of people out there writing about these aspects. unfortunately, there are more authors than topics. Additionally, some of these topics are really important, so their repetition is understandable.
2.) There is a lot of crap out there - The internet is great in that it can give anyone a voice. Many people have shitty voices.
3.) I am not an expert - I consider myself a good painter. But there is always someone who is better or more knowledgeable. Someone I can learn from IS out there.
4.) In order to get better, you have to push yourself - complacency and a 'good enough' mentality are killers. If you want to get better, you have to leave your comfort zone at some point.
So what does this all mean for my vision of my blog? Besides meaning that I come off as an elitist (I am to an extent), it means that I need to do something different about my content.
I see too many blogs, forum posts and articles out there aimed at mediocrity - painting the model to table top standards. The 'good enough' approach. It's either dumbed down, say nothing versions of good articles or some stupid-shit trying to tell you that drybrushing is the only technique you'll ever need.
Repeating a topic is inevitable. However, providing crappy information is not. I am going to take a more research oriented stance on things. If I don't know how to do something, I'm not going to pretend that I do. If someone has a better take on things than I do, I'll link their info and then comment on it. I'm not going to rehash topic after topic because I need to say things my way because of vanity or a need for 'original content'. If there is someone out there who is better than me, then you'll know about it.
Now, I'm still going to do vanity posts and show off my work and I'm still going to talk about other aspects of the hobby, but when it comes to painting, I won't settle for the "table top standard". If you really dig painting, then neither should you.

Monday, March 23, 2009
Saturday, March 21, 2009
You Don’t Need A Fancy Camera (To Take Great Photos of Your Miniatures)
The following is an article that I find to be of great use. The guy who wrote it (screen name: Hyun) has since discontinued updating his blog, but has, so far, maintained the existing content. At least until he decides that the trouble and expense of maintaining a dead website isn't worth it.
I've never really explored the full content at WeeToySoldiers, but as I was writing this intro, I began to actually poke around the rest of the content. There's a lot of good stuff there that I'll need to start sifting through in the near future.
In particular, there is one article that got me to the site that I use all the time. I am adding it to my blog in an effort to make sure it is available. Its a bit long and a bit pic heavy, but well worth it.
Without further ado, here it is - courtesy of WeeToySoldiers:
You Don’t Need A Fancy Camera (To Take Great Photos of Your Miniatures)
I often get compliments on the photos on the website. Photography is a hobby I’ve enjoyed for a number of years, and I try my best to achieve the best results possible with the equipment I have.
However, often it seems people think that “great camera gear = great photos.” People, that is just not so. All it takes is a basic camera, a basic understanding of lighting, and a basic image editing program to achieve great results. Did you note the common theme in those ingredients? They are all basic stuff. Today I hope to illustrate how easy it is to achieve great results using a run-of-the-mill digital camera and a free image editor. If you have a digital camera in your possession, you are 9/10th of the way there to getting great photos.
Obviously, there are miniature hobbyists and painters out there who are also excellent photographers. This guide is for those who are not happy with their miniatures photography and would like to achieve better results. I certainly do not claim to be an expert in this area; but it seems that there are a lot of people who would benefit immensely by a simple-to-follow tutorial (that I hope this turns out to be!)
For this demonstration, I will be using my wife’s Sony S600 digital camera. It’s a no-frills, basic, six-megapixel camera that came out two years ago that’s geared for people who just want a fully automatic camera. It lacks some of the features I use regularly for the hobby photography such as aperture priority, full manual mode, true macro mode, custom white balance, etc. (don’t know what some or any of those terms mean? Don’t worry, you don’t need to!), but is perfect for demonstrating the feasibility of using a consumer digital camera to achieve great results.
Before you embark on your way to better photography, there are some prep work you need to do. First of all, you need to find out some very basic facts about your camera. Either the manual that came with the camera or the manufacturer’s website will have full technical specifications for your camera. The one you need the most is the macro mode minimum focusing distance. That is, how close the subject can be to the camera and have the camera still focus. Make a note of this figure.
While you’ve got the manual, it’s a good idea to make sure that you know how to perform the following functions on the camera:
For editing your photographs, if you don’t already have an image editor that you like/prefer, I highly recommend Picasa, published by Google (but available only for Windows 2000/XP/Vista, I’m afraid). It’s free and it doubles as an image manager (it creates a database of your images and thumbnails and makes it rather easy to manage your photos), and also has some handy image editing tools. A very nice feature of Picasa is that it never modifies your images as you edit them; it makes notes of what changes have been applied to what images in its own setting file, and thus your originals are never altered. Picasa lets you also save as JPGs the new versions of your originals, incorporating the changes you’ve applied to them. In this tutorial, I will be using Picasa to demonstrate various image editing tasks.
Right, so let’s assume you have an image editor on your computer already, or have downloaded and installed Picasa, and have the camera in front of you, and a number of miniatures you want to photograph. Let’s begin.
I've never really explored the full content at WeeToySoldiers, but as I was writing this intro, I began to actually poke around the rest of the content. There's a lot of good stuff there that I'll need to start sifting through in the near future.
In particular, there is one article that got me to the site that I use all the time. I am adding it to my blog in an effort to make sure it is available. Its a bit long and a bit pic heavy, but well worth it.
Without further ado, here it is - courtesy of WeeToySoldiers:
You Don’t Need A Fancy Camera (To Take Great Photos of Your Miniatures)
I often get compliments on the photos on the website. Photography is a hobby I’ve enjoyed for a number of years, and I try my best to achieve the best results possible with the equipment I have.
However, often it seems people think that “great camera gear = great photos.” People, that is just not so. All it takes is a basic camera, a basic understanding of lighting, and a basic image editing program to achieve great results. Did you note the common theme in those ingredients? They are all basic stuff. Today I hope to illustrate how easy it is to achieve great results using a run-of-the-mill digital camera and a free image editor. If you have a digital camera in your possession, you are 9/10th of the way there to getting great photos.
Obviously, there are miniature hobbyists and painters out there who are also excellent photographers. This guide is for those who are not happy with their miniatures photography and would like to achieve better results. I certainly do not claim to be an expert in this area; but it seems that there are a lot of people who would benefit immensely by a simple-to-follow tutorial (that I hope this turns out to be!)
For this demonstration, I will be using my wife’s Sony S600 digital camera. It’s a no-frills, basic, six-megapixel camera that came out two years ago that’s geared for people who just want a fully automatic camera. It lacks some of the features I use regularly for the hobby photography such as aperture priority, full manual mode, true macro mode, custom white balance, etc. (don’t know what some or any of those terms mean? Don’t worry, you don’t need to!), but is perfect for demonstrating the feasibility of using a consumer digital camera to achieve great results.
Before you embark on your way to better photography, there are some prep work you need to do. First of all, you need to find out some very basic facts about your camera. Either the manual that came with the camera or the manufacturer’s website will have full technical specifications for your camera. The one you need the most is the macro mode minimum focusing distance. That is, how close the subject can be to the camera and have the camera still focus. Make a note of this figure.
While you’ve got the manual, it’s a good idea to make sure that you know how to perform the following functions on the camera:
- Change the exposure compensation value (make the image brighter or darker than the camera thinks it ought to be)
- Put the camera in macro mode
- Change the white balance setting, and if your camera has this feature, be able to set custom white balance
- Disable built-in flash
- Set timer
- Be able to tell when the camera has achieved proper focus vs. out-of-focus warning
- Have a rudimentary understanding of histogram and its function
For editing your photographs, if you don’t already have an image editor that you like/prefer, I highly recommend Picasa, published by Google (but available only for Windows 2000/XP/Vista, I’m afraid). It’s free and it doubles as an image manager (it creates a database of your images and thumbnails and makes it rather easy to manage your photos), and also has some handy image editing tools. A very nice feature of Picasa is that it never modifies your images as you edit them; it makes notes of what changes have been applied to what images in its own setting file, and thus your originals are never altered. Picasa lets you also save as JPGs the new versions of your originals, incorporating the changes you’ve applied to them. In this tutorial, I will be using Picasa to demonstrate various image editing tasks.
Right, so let’s assume you have an image editor on your computer already, or have downloaded and installed Picasa, and have the camera in front of you, and a number of miniatures you want to photograph. Let’s begin.
<==>
Here we have the setup. An even surface for the camera and the photo subject to sit on is a must. Most digital cameras have flat bottoms that you won’t need to do anything special to prop up the camera at an even level. For the subjects (miniatures), make sure that the background behind them is not distracting from the miniatures. Here I used a piece of paper curled and laid to sit against a rigid back support to achieve a blank backdrop.
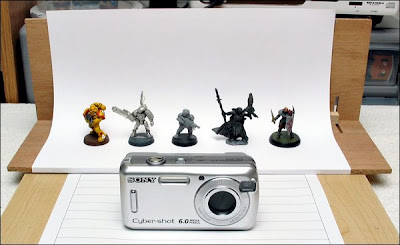 My hobby room is lit by two 100-watt lamps pointing upwards to the white ceiling. When photographing, it’s absolutely essential to turn OFF the flash on the camera and make sure that the light shining on the miniatures is soft and indirect, not harsh direct light. How bright your lamps are, or how many you have, does not really matter, as you can adjust the settings on the camera to achieve proper exposure.
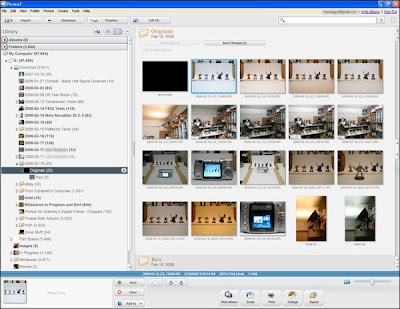
 Here’s the Picasa software, in the image manager mode. To the left of the screen, you have the familiar Windows Explorer-type tree pane for navigating the contents of the hard drive. The right part shows the thumbnails of the images contained in the currently selected folder.
When you double-click on an image, Picasa instantaneously launches the Editor window:
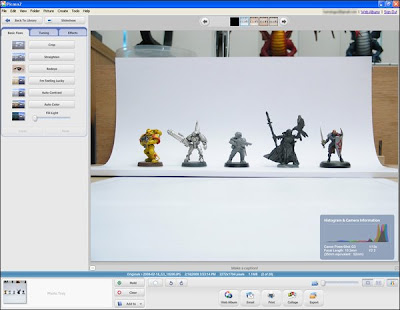 Here you can view your image in greater detail, and also view the histogram (the distribution of light in your photo). To the left of the screen is the group of buttons that cover all the editing functions that Picasa has to offer.
 “Crop” is for cutting out distracting, non-essential details from the photo. “Straighten” is for correcting out-of-alignment photos. “Redeye” — well, that won’t be necessary for the miniatures! “I’m Feeling Lucky” lets Picasa analyze and correct your photo the way it thinks it should be. I almost never use it, but sometimes it’s pretty good. “Auto Contrast” and “Auto Color” corrects, ah, contrast and color balances. I use “Auto Color” sometimes, “Auto Contrast” never, as I prefer more manual controls (available in the next tab, “Tuning”). “Fill Light” controls the brightness of the scene without blowing out the highlights.
All right, back to the miniatures. Here the miniatures have been arranged, and the camera — Sony S600 — is ready to take the picture. The LCD monitor on back of the camera makes it very easy to frame the scene:
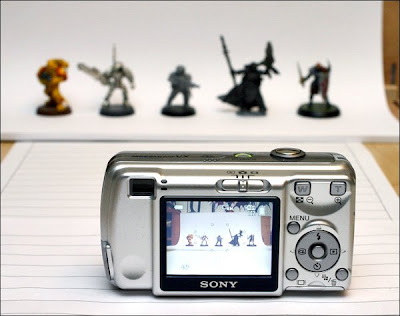 Before taking the picture, I made sure of the following:
 My hobby room is lit by two 100-watt lamps pointing upwards to the white ceiling. When photographing, it’s absolutely essential to turn OFF the flash on the camera and make sure that the light shining on the miniatures is soft and indirect, not harsh direct light. How bright your lamps are, or how many you have, does not really matter, as you can adjust the settings on the camera to achieve proper exposure.
 Here’s the Picasa software, in the image manager mode. To the left of the screen, you have the familiar Windows Explorer-type tree pane for navigating the contents of the hard drive. The right part shows the thumbnails of the images contained in the currently selected folder.
When you double-click on an image, Picasa instantaneously launches the Editor window:
 Here you can view your image in greater detail, and also view the histogram (the distribution of light in your photo). To the left of the screen is the group of buttons that cover all the editing functions that Picasa has to offer.
 “Crop” is for cutting out distracting, non-essential details from the photo. “Straighten” is for correcting out-of-alignment photos. “Redeye” — well, that won’t be necessary for the miniatures! “I’m Feeling Lucky” lets Picasa analyze and correct your photo the way it thinks it should be. I almost never use it, but sometimes it’s pretty good. “Auto Contrast” and “Auto Color” corrects, ah, contrast and color balances. I use “Auto Color” sometimes, “Auto Contrast” never, as I prefer more manual controls (available in the next tab, “Tuning”). “Fill Light” controls the brightness of the scene without blowing out the highlights.
<==>
All right, back to the miniatures. Here the miniatures have been arranged, and the camera — Sony S600 — is ready to take the picture. The LCD monitor on back of the camera makes it very easy to frame the scene:
 Before taking the picture, I made sure of the following:
 - Changed the white balance setting to tungsten, as I was using that type of light bulbs
- Disable built-in flash
- Set timer
The S600 does not have a dedicated macro mode, but the manual tells me the minimum focusing distance is 12cm (c. 4.7 inches). The figures are well farther away than that, so all’s well.
Here’s the LCD screen of the S600 camera that shows the settings for the photo. It’s well worth to take a few minutes and discuss each setting I’ve marked with a red number.

1. White Balance Set to Tungsten.
White balance refers to the color temperature of the light sources. You’ll note that incandescent lights give off warm white color, while the flourescent bulbs are cooler. Daylight light bulbs to aid in painting give off different color light than others, as do LED lights, etc. White balance setting on the camera is your way of telling the camera what light sources are being used, so that the camera does not have to guess (which is what Automatic White Balance, or AWB), is. Most newer cameras do a bang-up job of guessing the color temperature of the light sources, but usually setting it to a specific white balance is more accurate. Some cameras lets you set custom white balance, for those truly tricky lighting situations, or if you just want more control over the photos. For a more wordy explanation, see my post here.
The admittedly underexposed image below shows the effects of white balance settings; on top, the camera tried to adjust the white balance automatically (AWB) and failed miserably. The same scene is at the bottom using the same camera, but with the white balance set properly.

2. Program (or Program Auto) Mode.
Most compact digital cameras have two auto modes: The Full Auto (usually a green rectangle with or without the word “Auto” in it), where the camera decides every single aspect of the picture making process (you simply point the camera at the subject and press the shutter), and Program Auto, which is not unlike the Full Auto but here you get to decide (and override) the camera on a few things, such as whether to fire the flash or not, what ISO sensitivity to use (more on this later), image quality, etc. Whenever possible, never use the Full Auto. You need to be able to set a few parameters yourself, despite your camera’s best intentions.
3. Timer.
Use timer whenever possible. With the camera sitting solidly on a flat surface, it may not seem necessary, but too often people jostle the camera as they press the shutter, resulting in blurred or less-than-sharp picture. Also, since you won’t be using the built-in flash and will be relying on ambient lighting, the shutter time is going to be far longer than what you can hand-hold without shaking the camera too much (and the resulting blur in your pictures). You can set the timer in a variation of 10 seconds, 2 seconds, and the newer custom (you set the length).
4. Resolution.
Most digital cameras are capable of capturing images in smaller resolution than the maximum possible. Always use the maximum resolution. Storage is cheap, and it’s easy to resize the images to smaller resolution on the computer later, but not the other way around.
5. JPG Quality.
All digital cameras let you determine the quality of the JPG images being saved (then there are digital SLRs and higher-end point-and-shoot cameras that can capture Raw images, but that’s not a subject for this article). Typically you have three settings — superfine, fine, standard, or some variation thereof. Setting it to higher compression results in smaller file sizes and thus you can store more images on your memory card, but I recommend against this. Always use the best quality (lowest compression, and thus biggest file sizes). Again, storage is cheap, and it’s always possible down the road to resize/reduce the image’s quality, if desired. Not the other way around.
6. ISO Setting.
ISO refers to the sensitivity of the sensor inside the camera that actually captures the image, to light. Without going into technical details here, suffice it to say that lower the ISO setting, better the image quality. Higher ISO settings come in handy when you are hand-holding the camera and can’t use the flash — for example, in a museum or a gallery or you don’t want to draw attention to yourself with the flash. So in such situations, achieving a proper exposure at the lowest (best image quality) ISO requires far longer than how long an average person can hold the camera without the handshake introducing blur to the image. Higher ISO makes the camera more sensitive to light, thus it requires shorter time to capture the scene with the available light. But the downside is that with heightened sensitivity comes increases sensor “noise” (interference, static, whathaveyou) and corresponding image degradation. With most compact digital cameras, ISO 400 or higher is not really usable. With miniatures photography using a tripod or resting the camera on a flat surface, the longer exposure time (also known as slower shutter speed) is not an issue, so it makes sense to use the lowest ISO setting giving the best image quality.
The image below shows the comparison between ISO 80 (the lowest on the Sony S600 camera), ISO 400, and ISO 1000 (highest on the S600):

… and the shutter speeds were, respectively, 1/8 second, 1/40 second, and 1/100 second.
7. Focus Area.
Self-explanatory, but make sure that you select focus mode that will achieve the focus you want. For example, if a figure is pointing a sword to his front, make sure you focus on the face, which presumably is in line with the rest of his body, rather than the sword tip, which most likely is in front of the figure and thus the rest of the figure will be out of focus.
Here’s an example: In the first picture, the camera has focused on the tip of the gun barrel of the Tau XV15 Stealth Suit figure, with the result that the rest of the body is quite blurred. In the second picture, the body is in focus, the gun barrel is a bit blurred, but the overall effect is more pleasing.

Of course, the best solution is to have the entire miniature in focus!

With compact digital cameras that lack aperture priority mode, this can be achieved by NOT using the macro mode and moving the camera away from the subject.
<==>
With all that preparation out of the way, let’s take some pictures.
CLICK! The shutter is released, and the first image is captured. Keeping in mind the golden rule of the digital photography (”everything looks good in the tiny 2.5″ LCD screen; download and review!”), I downloaded the image to the computer and opened up in Picasa.

The image is severly underexposed! The camera tried to calculate the proper exposure, but it was most likely fooled by the large amount of white in the backdrop. Hence the underexposure.
Now, at the bottom right corner of the Picasa screen, take a look at this spectacularly nifty feature (not of Picasa, but of general digital photography): Ladies and Gentlemen, meet histogram.
 Histogram, simply put, shows you the distribution of light in the scene. Here’s how Canon describes it:

Some digital cameras lets you see histogram as you compose the image (aka live view), which is supremely neat. You can see how the exposure is going to be, and thus correct the problem (by changing the exposure compensation value) even before the first shot.
Still others shows you histogram right after the picture is taken, when you are reviewing the images on the camera’s screen. This is useful as well — although not as useful as the histogram in live view mentioned above — as you can usually retake the offending picture again right away.
Then there are cameras (such as the S600 that I’m using for this article) that do not show histogram anywhere, period. For those we need to download the images to the computer and view the histogram with the image editing program.
So, we need to retake the image, increasing the exposure compensation value to override what the camera thinks the proper exposure should be. After a number of tests, I finally achieved the result that I was happy with (I ended up increasing exposure compensation by +1.7, which is pretty significant):

… and the histogram:

It should be noted here that I could have corrected the original underexposed image by using Picasa’s editing tools. A couple of quick adjustments under the “Tuning” tab in the editing window…
 … results in this!

Note the difference before and after, and the histogram before and after:


I still prefer to have the proper exposure captured in camera, as it’s always better to start the editing steps on the computer with images that are best possible quality. It’s easy to change and modify the original images, but you can’t add what wasn’t there in the first place.
You’ve probably noticed that the past few images all have pink-ish tint to them? What happened? This is the result of the camera’s custom balance not quite being up to the task of correctly analyzing the light sources. Some of the more advanced cameras have the setting where you can apply custom white balance values, but the S600 I used does not. So it’s back to Picasa to eliminate the pink tint.
Picasa has a command called “Auto Color,” which tries to render the image’s colors correctly. Usually it works well, although sometimes more user input is required.
 Here’s the result of Auto Color command superimposed on the right half of the screen. Can you tell the difference?

It still needs a bit of help. So, going back to the “Tuning” tab, I use the “Neutral Color Picker” tool to properly achieve the white balance:

<==>
From here on, it’s mostly finishing touches.
If your image is not horizontally aligned, you can use Picasa’s “Straighten” tool to rotate it.

Picasa has a bevy of special effects you can apply to the image. Probably the most useful one of the bunch is “sharpen.”

When you’re all done tinkering with the image, it’s time to crop and export. Remember, all your editing so far in Picasa do not change the original image, they are stored in a special Picasa file that records the changes you’ve made. What we now need to do is make a copy of the original, applying those changes in the process.
Here’s the crop window…

… and the final image.

Press the “Export” button under the main editing window, and the “Export to Folder” dialogue pops up. Here you can select the destination on your hard drive, the name of the folder, whether to resize it down or keep the original size, and the quality of JPG. You can export multiple files at a time.
 … and when the export process is complete, Windows Explorer opens at the destination folder, showing the contents.

And here’s the fruit of my labor:

From here you can upload the image to any number of photo hosting sites and share your work!
<==>
[This section was added a day after the original article was posted — Ed.]
For those desiring to get close-up photos of their work, the key factor is to remember the minimum focusing distance for your camera in macro mode. Remember, the minimum focusing distance changes depending on the optical zoom setting — the distance is closer at the wider end of the zoom range, and much farther at the telephoto end.
The Sony S600 does not, as noted previously, have a dedicated macro mode, and the minimum focusing distance is around 12cm (just under 5 inches). I basically moved the camera close to the miniature, then moved it back a little bit at a time, trying to focus, until the focus lock was achieved. Here’s the Tau XV15 Stealth Suit at the closest focusing distance to the camera:

… which is a bit meaningless, really, until you look at the image at 100% crop. 100% crop is viewing the image at the pixel level. Typically, your monitor is set at 800, 1024, or 1280 pixels across. So when an image that’s wider than that is shown, the image viewing software resizes it down to fit the screen, so that you can take in the entire image at a glance, rather than having to scroll horizontally. 100% crop is viewing the image without any resizing.
Depending on how your browser’s configured, the image may “shrink-to-fit” your screen. Be sure to view it at 100% after it’s done loading to get the full effect. Alternatively you can right-click on the link, and choose “Save target as”/”Save link as”, and download it to your computer and view it with your favorite image viewer.
Lauby's Note: I couldn;t get the image he is referring to as his link seemed to be dead. Bummer.
… and here’s a cropped 100% section of the face/chest area:

<==>
Well, that’s it. Hopefully this tutorial has given you a better understanding of what’s involved in making great photos of your miniatures. I would, as always, appreciate any comments for constructive feedback. Thanks.
Sunday, March 15, 2009
The Limits of Good Taste and Knowing When to Pack It In - Part IV
So I’ve explored the limits of good taste with my three examples. But what about knowing when to pack it in?
It’s easy to point and laugh at someone’s space Nazis. It’s much harder to take a step back and evaluate your own position. Unfortunately, you need to take this step back more than you might think.
Tunnel vision is a bitch and is real easy to fall into. If you get too focused on the project you may stop asking yourself critical questions concerning your color choice, a symbol or even your background ideas. Then, when it’s all said and done, you have a high chance for some level of shittyness to be staining your project.
For me, the best way to combat tunnel vision is to get second opinions from other people – preferably those people who won’t lie to spare your feelings. Bonus points if they have significantly different ideas about the hobby than you do. I ask my girlfriend. Other people to ask would be close friends or even your parents. Remember, they’re not commenting on your painting skills, but rather the idea you’re going with. Now while other people’s opinions are like assholes and far from a foolproof check, it’s still valuable. Ask people early and often.
DO NOT RELY ON FORUM USERS TO HELP YOU. Not all feedback is created equal. The real people you know will be much more helpful than a collection of random, anonymous strangers on the internet. You can always see if anonymous strangers have anything helpful to say, but don’t count on it.
Forums (especially table top gaming forums) aren’t usually useful because they have a number of critical limitations.
1.) First and foremost, you don’t know these people. They may be overly nice (because they are polite, well mannered individuals) or overly critical of you (because they are assholes) by this simple fact. They will either support and encourage you or tear you apart. No matter what and for little reason.
2.) Most forums have a ‘no being mean’ rule. Criticism (constructive or not) often falls under the ‘being mean’ category. WIP sections of various forums are strictly for making people feel better about themselves and getting bullshit compliments. They are NOT for receiving any kind of useful feedback. The mods and the white-knighters will see to this.
Here is an example from Warseer’s rules:
3.) There are a ton of attention whores. They like to give you advice even if they have no fucking clue. They create a lot of noise with little use and will go to great lengths to maintain their own opinion of themselves.
There are other things to keep in mind to help fight tunnel vision. These are useful even if you don’t have reliable people to help you out.
1.) Keep in mind that what you paint on your models reflects on you to some extent. Your models would not be there unless someone put some time and effort into them. When people see your completed labors, they know this. If you’ve painted an entire army with say… Nazi iconography and/or boobs on it, they assume that you put some serious thought behind the project that represents a ton of man hours. If you are comfortable being the “Nazi guy” or “boob guy”, carry on. Otherwise, think of a new gimmick.
2.) WWII and you: World War II is fascinating for a variety of reasons. I won’t go into them. However, 70 million people died and every country involved has something to be ashamed off.
So while the pictures of the war are extremely useful and the stories and events involved are great for all kinds of inspiration, stay the hell away from stuff that clearly identifies your army with an actual participant in WWII.
Aaand that’s the end of my sage advice. Bottom line: please, please take a step back from time to time and look at your work from other angles. Nothing is worse for yourself than (finally) realizing your ‘beautifully’ painted (and expensive) army is a dog turd. And nothing is worse for other people than having to deal with your dog turd.
It’s easy to point and laugh at someone’s space Nazis. It’s much harder to take a step back and evaluate your own position. Unfortunately, you need to take this step back more than you might think.
Tunnel vision is a bitch and is real easy to fall into. If you get too focused on the project you may stop asking yourself critical questions concerning your color choice, a symbol or even your background ideas. Then, when it’s all said and done, you have a high chance for some level of shittyness to be staining your project.
For me, the best way to combat tunnel vision is to get second opinions from other people – preferably those people who won’t lie to spare your feelings. Bonus points if they have significantly different ideas about the hobby than you do. I ask my girlfriend. Other people to ask would be close friends or even your parents. Remember, they’re not commenting on your painting skills, but rather the idea you’re going with. Now while other people’s opinions are like assholes and far from a foolproof check, it’s still valuable. Ask people early and often.
DO NOT RELY ON FORUM USERS TO HELP YOU. Not all feedback is created equal. The real people you know will be much more helpful than a collection of random, anonymous strangers on the internet. You can always see if anonymous strangers have anything helpful to say, but don’t count on it.
Forums (especially table top gaming forums) aren’t usually useful because they have a number of critical limitations.
1.) First and foremost, you don’t know these people. They may be overly nice (because they are polite, well mannered individuals) or overly critical of you (because they are assholes) by this simple fact. They will either support and encourage you or tear you apart. No matter what and for little reason.
2.) Most forums have a ‘no being mean’ rule. Criticism (constructive or not) often falls under the ‘being mean’ category. WIP sections of various forums are strictly for making people feel better about themselves and getting bullshit compliments. They are NOT for receiving any kind of useful feedback. The mods and the white-knighters will see to this.
Here is an example from Warseer’s rules:
8) Please respect other people's choices and opinions. Do not make fun of their painting, their miniatures, or their armies. It only serves to discredit your stance.
3.) There are a ton of attention whores. They like to give you advice even if they have no fucking clue. They create a lot of noise with little use and will go to great lengths to maintain their own opinion of themselves.
There are other things to keep in mind to help fight tunnel vision. These are useful even if you don’t have reliable people to help you out.
1.) Keep in mind that what you paint on your models reflects on you to some extent. Your models would not be there unless someone put some time and effort into them. When people see your completed labors, they know this. If you’ve painted an entire army with say… Nazi iconography and/or boobs on it, they assume that you put some serious thought behind the project that represents a ton of man hours. If you are comfortable being the “Nazi guy” or “boob guy”, carry on. Otherwise, think of a new gimmick.
2.) WWII and you: World War II is fascinating for a variety of reasons. I won’t go into them. However, 70 million people died and every country involved has something to be ashamed off.
So while the pictures of the war are extremely useful and the stories and events involved are great for all kinds of inspiration, stay the hell away from stuff that clearly identifies your army with an actual participant in WWII.
Aaand that’s the end of my sage advice. Bottom line: please, please take a step back from time to time and look at your work from other angles. Nothing is worse for yourself than (finally) realizing your ‘beautifully’ painted (and expensive) army is a dog turd. And nothing is worse for other people than having to deal with your dog turd.
Sunday, March 1, 2009
The Limits of Good Taste and Knowing When to Pack It In - Part III
Doctor Thunder‘s Black Widow Space Marines –“I’m at a loss for words.”
Doctor Thunder really likes giant boobs and fem dom. He also has an unrealistic view of the ideal woman. He decided to incorporate these things into his gaming. The end result: space marines with tits and a host of creepy fan fiction.
 While the previous examples were more offensive (and stupid) more than anything else, the booby marines fall firmly in the creepy category (and are stupid). Mind bogglingly so. Maybe they are offensive... so creepy they're offensive? Even more boggling is the fact that people seem to love his space transsexuals. I do not. Despite public opinion and a hinted at Games Day award, I find his creations to be, well, gross and pathetic.
I also polled some ladies to see what they thought In fairness this was only my girlfriend - but hey, it’s my shoddy journalism, not yours. Among musings on the need for some kind of psychological help (sex therapist or otherwise), this being ‘fucked up’ and refusing to look past the first page of pics, the thing that she said that stands out the most is this:
 I think that sums things up nicely. Ol’ Doc Thunder has clearly decided that while a few boobs on certain models is good, putting boobs on everything is so awesome it makes his boner explode. Later on I will subject you to more of his pubescent boy understanding of sex and women.
Not gonna comment on the paint job or modeling – its table top standard. Though, the construction of so many greenstuff breasts is a misuse of putty. Also, People also really need to learn that there are other techniques beside dry-brushing*. I just want to point out that the whole concept and execution is a little disturbing – especially in light of the fan fiction (interspersed in his threads).
 Fan Fiction Fun Facts:
So, we get even deeper into some sexual fantasies. Delightful. We now have some creepy background to go with his freakish boob marines.
Bonus: He has a wife who has apparently been briefed on all this and made no apparent attempt to stop it.
Bonus 2: He has posted his army on a ton of other forums to spread the creepy around. He is very, very proud of himself.
Thankfully, there are a handful of people who aren't giving Doc Thunder text based hand-jobs and actually agree with my point of view. The internet is saved.
 So… here we are at the end of another project that should have been scrapped before it got to this point. This point in question being finished and proudly displayed. So, before you decide to create an army based on your fan fiction centering around your hentai sexual fantasies, please don’t. Don’t be ‘that guy’. Don’t subject the rest of us to your creepy fucking army.
Doctor Thunder really likes giant boobs and fem dom. He also has an unrealistic view of the ideal woman. He decided to incorporate these things into his gaming. The end result: space marines with tits and a host of creepy fan fiction.
While the previous examples were more offensive (and stupid) more than anything else, the booby marines fall firmly in the creepy category (and are stupid). Mind bogglingly so. Maybe they are offensive... so creepy they're offensive? Even more boggling is the fact that people seem to love his space transsexuals. I do not. Despite public opinion and a hinted at Games Day award, I find his creations to be, well, gross and pathetic.I also polled some ladies to see what they thought In fairness this was only my girlfriend - but hey, it’s my shoddy journalism, not yours. Among musings on the need for some kind of psychological help (sex therapist or otherwise), this being ‘fucked up’ and refusing to look past the first page of pics, the thing that she said that stands out the most is this:
“It’s like a little kid with crayons scribbling on everything. Except its boobs”
I think that sums things up nicely. Ol’ Doc Thunder has clearly decided that while a few boobs on certain models is good, putting boobs on everything is so awesome it makes his boner explode. Later on I will subject you to more of his pubescent boy understanding of sex and women.Not gonna comment on the paint job or modeling – its table top standard. Though, the construction of so many greenstuff breasts is a misuse of putty. Also, People also really need to learn that there are other techniques beside dry-brushing*. I just want to point out that the whole concept and execution is a little disturbing – especially in light of the fan fiction (interspersed in his threads).
Fan Fiction Fun Facts:1.) His lady marines may OR may not participate in sexual debauchery.
2.) The finest enemy soldiers are captured as breeding stock - i.e. for sexin'
3.) “Mammory glands noted to be unusually large for frame (89th percentile for standard human female).” + “The subject’s brain’s pleasure center is approximately 38% larger then in found in standard human females” Direct quotes. Yikes.
4.) His battle reports are… insightful as well (note the 'breeders captured' stat after each battle)
So, we get even deeper into some sexual fantasies. Delightful. We now have some creepy background to go with his freakish boob marines.
Bonus: He has a wife who has apparently been briefed on all this and made no apparent attempt to stop it.
Bonus 2: He has posted his army on a ton of other forums to spread the creepy around. He is very, very proud of himself.
Thankfully, there are a handful of people who aren't giving Doc Thunder text based hand-jobs and actually agree with my point of view. The internet is saved.
 So… here we are at the end of another project that should have been scrapped before it got to this point. This point in question being finished and proudly displayed. So, before you decide to create an army based on your fan fiction centering around your hentai sexual fantasies, please don’t. Don’t be ‘that guy’. Don’t subject the rest of us to your creepy fucking army.
Subscribe to:
Posts (Atom)