
And this:
On Sunday, Nikephoros hit me up with a question:
Oh man that looks incredible. If you don't mind sharing, what gold do you use? I don't get why GW silvers are so good but the golds are so bad. I'd love to know your recipe.
Because its a good question and because he's having such a completely shitty week, this one goes out to Nikephoros.
Allright, the first thing that you (plural here) is that most acrylic gold paint is shit. It's not an issue for a specific brand - its an issue for the color in general.
Most of the gold paint you're gonna come across is formulated for a specific consistency that's usually ready to use out of the pot/dropper. The problem comes from the fact that the pigments typically used in gold paint have the same issues as yellow paint - the pigmentation isn't all that opaque. The coverage is shit. Some brands will play with consistence to get a paint that'll coat well... but it's usually goop. It's bad either way.
Using my trusty beastmans, here's an example:
 |
| on the axes - one coat over a black base. |
The trick that I like to use to cheat my way past this is to mix the metallic paint with a brown for the base layers. This does two things:
- It lets you 'borrow' some of the opacity from the brown (generally good coverage) to get a better base coat
- It gives you an opportunity to do do some very cool things with your golds with almost no effort or special skillz required
Picking a brown to mix with your gold paint is the first and most important step. Unless I've got some special reason not to, I generally try and match the gold paint with a brown that has a similar hue. Red-browns for red-golds.*
Here are my examples. The model on the left got a mix of VGC Glorious gold and GW Scorched Brown. The model on the right got a mix of P3 Brass Balls and VMC English Uniform. (and yes, the wrong paint bottles are by the miniatures).
If you click into the pics for a closer look, you can see I've got kind of a tarnished gold thing going on with both models.
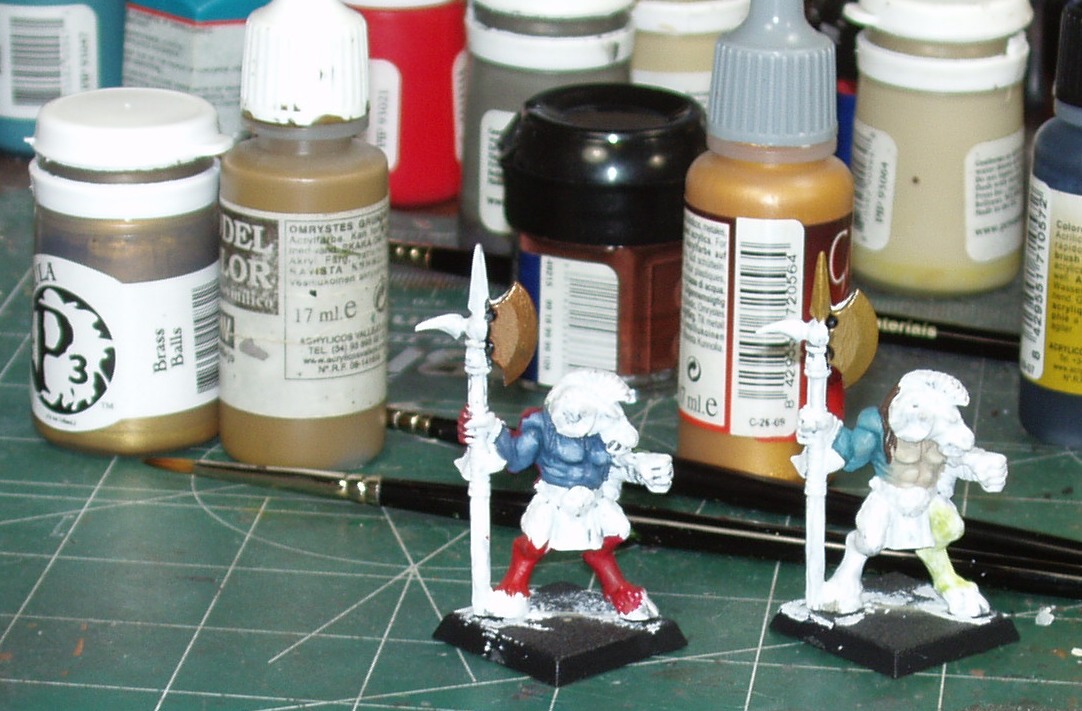
You can call this a base coat and go straight up to the 'raw' gold color (and saving a ton of time with base coating). OR you can get fancy and build up highlights and layers by slowly mixing more gold paint into your base. I do this all the time to get some pretty neat effects and to add a richness of color that I think straight gold paint lacks. Here are our two examples with some of that layering:

Some very nice golds with a lot of character. From here you can build up some finer highlights by adding silver or even a lighter shade of gold. You can even make a shading wash outline rivets and edges and stuff.
This pretty much what I do for all my golds.
And for completeness sake, here are my color mixing patches on my palette.

Now - to explicity answer Nikephoros' question, here's the recipe for the gold I used on Tyberos:
Base coat: the P3 (privateer press paint) Brass Balls and VMC (Vallejo model color) English Uniform (about 50/50).
Basic layers: I slowly add more Brass Balls into the base coat until I've built up a nice transition to the pure gold. As you're laying, you'll build up some gradients that leave some of the base color showing - this is also your basic shading.
Deep shading: P3 Armor Wash + P3 Umbral Umber + a dot of P3 Bloodtracker Brown. The exact mix here is a bit rough, but it's usually close to 50/50 on the Umber and wash before I adjust it with the last color. Be sparing when applying.
Highlighting: Add GW Mithril Silver into the Brass Balls for successive layers of highlighting.
Extreme Highlighting: Just straight Mithril on sharp corners and other prominent edges. Be careful with the highlighting as its really easy to push the overall effect to far into the silver category.
The same basic principle can be applied to any areas you want to paint gold, so don;t be afraid to experiment. Just keep the brown and the gold you use for the base close to the same hue and you should be.... golden.
------[Foot Notes]--------------------------
*Sandwyrm has a bunch of stuff on color theory that's relevant here (but don't get lost). Check it out.
Props! I will experiment with my Grey Knights, as they will have lots of gold bits. Thanks for the guide.
ReplyDeleteGood stuff. I'm gonna have to start painting gold this way - and I have plenty of Lizardmen to work on it with.
ReplyDeleteDear Brain,
ReplyDeletePlease retain the information I have learned here today.....
I realize I don't treat you properly, especially on weekends, but this is IMPORTANT.
Why is it you can retain Megan Fox's image so perfectly, but you won't remember to mix Brown with Gold to produce results like those displayed here? Why?
Look, Brain...I'm sorry. I'll cut back on the...stuff that hurts you.
No more 'Brain Cell Holocausts' for awhile, ok?
...but I better link the page, just in case....